
Editing text in Photoshop is easy once you understand how the Type Tool and text layers work. Whether you want to correct a spelling mistake, change the font, adjust text size, change colors, or move text around an image, Adobe Photoshop provides several useful tools to help you.
If you are a beginner, this guide will show you how to edit text in Photoshop with simple, step-by-step instructions. You will also learn how to edit text in an existing image, customize its appearance, and fix common text-editing problems.
What Does Editing Text in Photoshop Mean?
Editing text in Photoshop means changing the words, font style, size, color, position, or other properties of text in a design or image.
Photoshop uses text layers to keep written content separate from other design elements. This makes it easier to edit text without changing the entire image.
For example, you can use Photoshop to:
- Correct spelling and grammar mistakes.
- Change the font style and text size.
- Change text color.
- Move text to another position.
- Add shadows and other text effects.
- Adjust spacing between letters and lines.
- Delete unwanted text.
How to Edit Text in Photoshop
If your Photoshop document already contains editable text, you can change it in just a few steps.
Follow these instructions:
Step 1: Open Your Image in Photoshop
First, open Adobe Photoshop on your computer.
- Click File in the top menu.
- Select Open.
- Find the image or Photoshop document you want to edit.
- Select the file and click Open.
Your image will appear in the Photoshop workspace.
Step 2: Find the Text Layer
Look at the Layers panel on the right side of your screen.
Find the layer containing the text you want to change. Text layers usually have a small T icon next to their names.
If you cannot see the Layers panel, click Window and select Layers.
Click the text layer to select it.
Step 3: Select the Type Tool
Now select the Type Tool from the left toolbar.
You can also press the T key on your keyboard to activate it.
Photoshop provides two main types of text tools:
- Horizontal Type Tool: Adds and edits text horizontally.
- Vertical Type Tool: Adds and edits text vertically.
For most designs, the Horizontal Type Tool is the easiest option.
Step 4: Click and Edit Your Text
After selecting the Type Tool, click directly on the text you want to edit.
A text cursor will appear. You can now:
- Delete unwanted words.
- Add new sentences.
- Correct spelling mistakes.
- Replace existing text.
- Change individual letters or words.
Once you finish editing, click the checkmark in the top options bar or press Ctrl + Enter on Windows to confirm your changes.
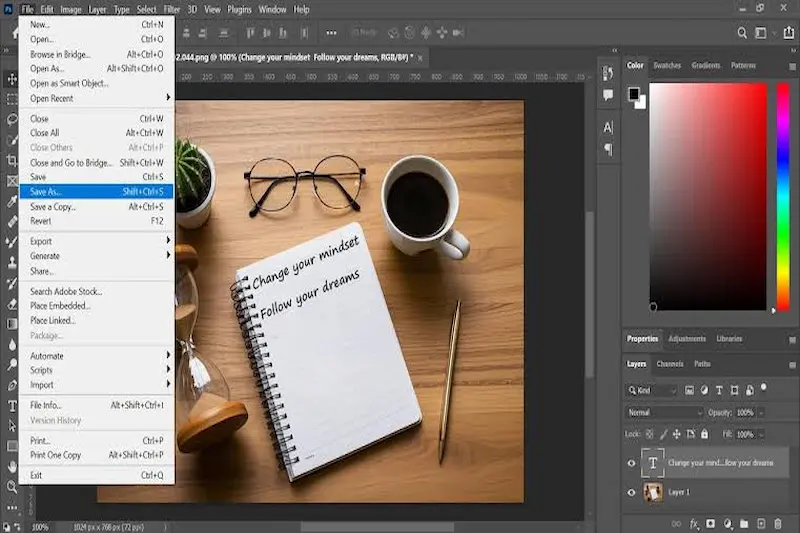
Step 5: Save Your Changes
After editing the text, save your Photoshop document.
- Click File.
- Select Save.
- Press Ctrl + S as a shortcut.
Save your document in PSD format if you want to keep the text layers editable.
If you need an image for sharing, use Save a Copy or Export As to save it in PNG or JPEG format.
How to Change Text Font in Photoshop
Changing the font can make your design look more professional and attractive.
Follow these steps:
- Select the text layer from the Layers panel.
- Activate the Type Tool.
- Highlight the text you want to change.
- Open the font menu in the top options bar.
- Select your preferred font.
- Check the result on your image.
You can choose different fonts depending on your design. For example, bold fonts work well for headings, while simple fonts are suitable for regular content.
You may also like it:
How To Edit Image Text In Word – Aarya Editz
How To Edit Video In Iphone – Aarya Editz
How To Edit Resume In Laptop – Aarya Editz
How To Edit Photos In Mobile – Aarya Editz
How to Change Text Size in Photoshop
If your text looks too small or too large, you can adjust its size easily.
- Select the text layer.
- Choose the Type Tool.
- Highlight the text.
- Find the font size option in the top toolbar.
- Enter your preferred size.
- Press Enter to apply the changes.
You can also use the Character panel to adjust the font size more precisely.
How to Change Text Color in Photoshop
Photoshop allows you to choose almost any color for your text.
Here is how to change text color:
- Select your text layer.
- Activate the Type Tool.
- Highlight the text.
- Click the text color box in the top options bar.
- Choose a color from the color picker.
- Click OK to apply it.
Choose a color that stands out against your background. For example, white text works well on dark images, while dark text is easier to read on light backgrounds.
How to Move Text in Photoshop
Sometimes, your text may not be in the right position. Photoshop allows you to move it without changing the rest of your design.
Follow these steps:
- Select the text layer.
- Press V to activate the Move Tool.
- Click and drag the text to your preferred position.
- Release the mouse button when you are satisfied.
You can also use your keyboard arrow keys to move text in small steps.
How to Add Effects to Text in Photoshop
Photoshop includes several effects that can improve the appearance of your text.
Some popular text effects include:
- Drop Shadow: Adds a shadow behind the text.
- Outer Glow: Creates a glowing effect around letters.
- Stroke: Adds an outline around the text.
- Gradient Overlay: Applies multiple colors to text.
- Bevel and Emboss: Gives text a raised or 3D-like appearance.
To apply these effects:
- Select your text layer.
- Double-click the layer or click the Layer Style icon at the bottom of the Layers panel.
- Choose the effect you want.
- Adjust its settings.
- Click OK.
You can combine multiple effects to create a unique design.
How to Edit Text in an Image That Has No Text Layer
One common problem beginners face is trying to edit text in a JPG or PNG image.
For example, you download an image from the internet, open it in Photoshop, and try to change its words. However, you cannot select the text using the Type Tool.
Why does this happen?
Because text in a JPG or PNG image is usually flattened into the image pixels. It is no longer an editable text layer.
However, you can still replace it.
Step 1: Remove the Existing Text
First, remove the old text from the image.
You can use these Photoshop tools:
- Remove Tool: Helps remove unwanted objects and text.
- Spot Healing Brush: Repairs small unwanted areas.
- Clone Stamp Tool: Copies nearby pixels to cover text.
- Content-Aware Fill: Fills a selected area using surrounding image details.
Choose the tool that works best for your background.
Step 2: Add New Text
After removing the old words, select the Type Tool by pressing T.
Click on the image and type your new text.
Step 3: Match the Original Design
Adjust the new text to match the original design as closely as possible.
Try to match:
- Font style.
- Font size.
- Text color.
- Alignment.
- Letter spacing.
- Position.
This will help your edited image look natural and professional.
How to Edit Text in Photoshop Without Changing the Original Design
If you want to protect your original design, make a copy of the text layer before editing.
Follow these steps:
- Select the text layer.
- Press Ctrl + J to duplicate it.
- Hide the original text layer.
- Edit the duplicated layer.
- Save your document.
This method gives you a backup if you make a mistake.
Common Photoshop Text Editing Problems and Their Solutions
Sometimes, Photoshop users experience problems when editing text. Here are some common issues and their solutions.
| Problem | Solution |
| Text is not editable | Check whether the layer is a text layer or a flattened image. |
| Font looks different | Install the correct font on your computer. |
| Text is too small | Increase the font size using the options bar. |
| Text is not visible | Check the text color and layer visibility. |
| Cannot select text | Select the correct text layer first. |
| Text looks blurry | Check image resolution and text scaling. |
Why Can’t I Edit Text in Photoshop?
There are several reasons why Photoshop may not allow you to edit text.
The most common reason is that the text has been converted into pixels. This often happens when someone saves an image as a JPG or PNG.
Other possible reasons include:
- The text layer has been rasterized.
- The document is locked.
- You have selected the wrong layer.
- The text is part of a flattened background.
If the text is rasterized, you cannot edit the original words directly. You will need to remove the old text and add new text.
Useful Photoshop Keyboard Shortcuts for Editing Text
Keyboard shortcuts can help you save time while working in Photoshop.
| Shortcut | Function |
| T | Select Type Tool |
| V | Select Move Tool |
| Ctrl + S | Save document |
| Ctrl + J | Duplicate selected layer |
| Ctrl + Z | Undo last action |
| Ctrl + A | Select all text while editing |
| Ctrl + Enter | Confirm text editing |
| Ctrl + T | Free Transform |
These shortcuts are especially useful when editing multiple text layers in a single design.
Tips for Professional Text Editing in Photoshop
If you want your designs to look clean and professional, keep these tips in mind:
- Choose readable fonts: Avoid overly decorative fonts for important information.
- Use suitable colors: Make sure your text is easy to read against the background.
- Maintain proper spacing: Keep enough space between letters and lines.
- Organize layers: Give your text layers clear names.
- Keep a backup: Duplicate important layers before making major changes.
- Use text effects carefully: Too many effects can make your design look messy.
- Save PSD files: Keep an editable version of your design for future changes.
Frequently Asked Questions (FAQs)
1. How do I edit existing text in Photoshop?
Select the text layer from the Layers panel, choose the Type Tool, and click on the text. You can then change the words, font, size, and color.
2. Can I edit text in a JPG image using Photoshop?
Yes, but you cannot directly edit flattened text in a JPG image. First, remove the existing text using a suitable Photoshop tool. Then add new text with the Type Tool.
3. What is the shortcut for editing text in Photoshop?
Press T to select the Type Tool. Then click on an editable text layer to make changes.
4. Why is my text not editable in Photoshop?
Your text may have been rasterized or flattened into the image. Check the Layers panel to see whether the layer has a T icon.
5. How do I change the color of text in Photoshop?
Select the text layer, activate the Type Tool, highlight the text, and click the text color option in the top toolbar. Choose your preferred color and apply it.
6. Can I edit text after saving a Photoshop file?
Yes. If you save your document in PSD format and keep the text layers editable, you can reopen the file and change the text whenever you want.
Conclusion
Learning how to edit text in Photoshop is an important skill for anyone interested in graphic design, photo editing, or digital content creation. With the Type Tool and text layers, you can easily change words, adjust fonts, resize text, change colors, and add creative effects.
Remember that text in PSD files is usually editable as long as its text layer is preserved. However, text in flattened JPG and PNG images requires a different approach. You may need to remove the original words before adding new ones.
Practice these simple steps, and you will become more comfortable editing text and creating professional designs in Photoshop.
