
Introduction
Top 3 Nagpuri Photo Editing Preset | Nagpuri Lightroom Presets photography captures the vibrant culture, landscapes, and traditions of Nagpur, a region known for its rich heritage, colorful festivals, and scenic rural beauty. Whether it’s the lively hues of a traditional celebration, the rustic charm of rural life, or the timeless beauty of a sunset over the fields, these images tell a unique story. However, bringing out the best in these photos often requires a touch of enhancement.
This is where Lightroom presets come in. Lightroom presets are pre-configured adjustments that instantly apply a certain style to your photos. They simplify the editing process, allowing photographers—whether amateurs or professionals—to quickly achieve stunning results without having to manually tweak each image setting. The right preset can elevate a photo, enhancing colors, moods, and textures that are central to Nagpuri photography.
In this post, we’ll explore the Top 3 Nagpuri Photo Editing Presets designed specifically for Lightroom. These presets are crafted to complement the unique essence of Nagpuri photography, helping you enhance your images with just a few clicks. Whether you’re capturing the vibrant festivals or the serene landscapes of Nagpur, these presets will take your photos to the next level, offering a blend of warmth, drama, and nostalgia.
Nagpuri Warm Tone Preset
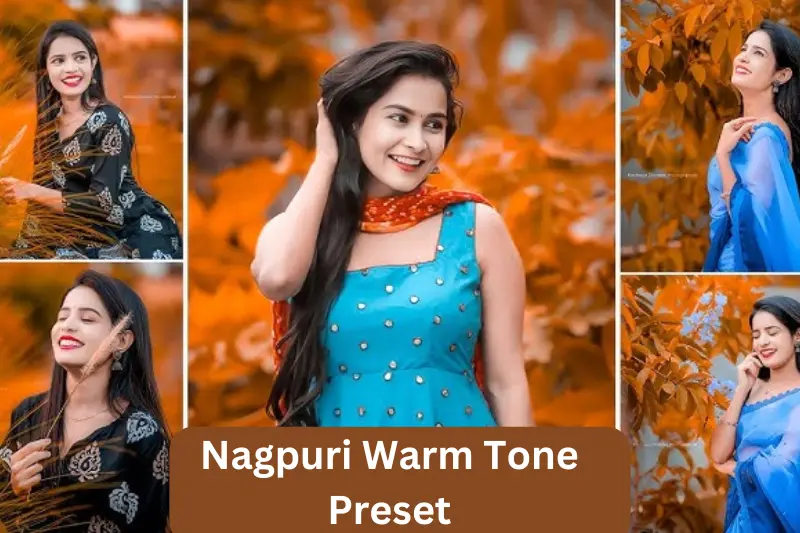
The Nagpuri Warm Tone Preset is designed to enhance the natural warmth found in Nagpuri landscapes, portraits, and cultural celebrations. The preset gives your photos a cozy, inviting feel by emphasizing rich golden, amber, and brown hues that complement the vibrant colors and traditional attire associated with Nagpur. Whether capturing a sunset over the fields or a lively festival scene, this preset brings out the warmth and beauty inherent in the surroundings, adding a touch of magic to every photo.
Key Features
- Warm Color Palette: The preset applies warm, earthy tones that mimic the golden-hour glow, enhancing the richness of the environment and the vibrancy of colors found in traditional attire or landscapes.
- Skin Tone Enhancement: It is especially beneficial for portrait photography, as it softens skin tones and gives a natural, healthy glow to the subjects, making them look radiant without overexposing the skin.
- Soft Contrast: This preset is designed to balance highlights and shadows without losing important details, ensuring your image looks both soft and dynamic.
- Saturated Yet Natural Colors: The warmth of the preset adds depth to reds, yellows, and browns, which are often found in Nagpuri traditional clothing, making these colors pop without becoming overly saturated.
Ideal Use
- Outdoor Portraits: The Nagpuri Warm Tone Preset is perfect for outdoor portraits, especially during the golden hour, where soft lighting and natural warmth bring the subject and their environment to life.
- Festival and Cultural Photography: This preset is great for highlighting the colors of Nagpuri festivals, like traditional dances or celebrations, where the natural lighting can be enhanced to give the scene an extra level of vibrancy.
- Landscape Photography: If you’re capturing the rural beauty of Nagpur—whether it’s fields, roads, or villages—this preset brings out the warm tones in nature, such as the rich browns of the earth or the golden hues of a setting sun.
How to Apply the Nagpuri Warm Tone Preset in Lightroom
- Import Your Photo: Open Lightroom and import your photo into the catalog.
- Select the Develop Module: Go to the ‘Develop’ module where you can see the editing tools.
- Apply the Preset: In the left-hand panel, locate the ‘Presets’ section. Choose the Nagpuri Warm Tone Preset from your preset collection.
- Fine-Tune Adjustments: After applying the preset, you may want to adjust the exposure, contrast, or vibrance to match the mood you envision for the image. You can use the basic sliders in the right panel for these fine-tunings.
- Export and Share: Once satisfied with the result, export your image in the desired resolution and format for sharing on social media, your portfolio, or printing.
Before & After Comparison
- Before: A regular outdoor portrait with harsh shadows and lackluster colors.
- After: Applying the Nagpuri Warm Tone Preset enhances the colors, softens the shadows, and adds a warm, golden glow to the skin tones and environment, giving the photo a richer and more inviting feel.
Nagpuri Black & White Preset
The Nagpuri Black & White Preset is designed to add dramatic contrast and timeless elegance to your Nagpuri photographs, perfect for those who appreciate the art of monochrome photography. This preset emphasizes the raw beauty and intricate details found in Nagpuri culture and rural life, transforming vibrant scenes into powerful black-and-white images. Whether you’re capturing the ruggedness of rural landscapes or the intensity of traditional festivals, this preset adds depth and emotion to your photos by focusing on light, shadow, and texture.
Key Features
- High Contrast: The preset is designed to increase the contrast between light and dark areas, creating a dynamic, visually striking effect. This highlights details such as the intricate textures of traditional clothing, the lines of rural architecture, or the expressions of people in the community.
- Rich Detail in Shadows & Highlights: It enhances the textures and patterns in the shadows and bright highlights, bringing out subtle details that are often lost in color photos. This helps add depth to both portraits and landscapes.
- Sharpness & Clarity: The preset enhances the clarity of details, making facial features and architectural elements stand out more sharply, creating a stronger visual impact.
- Timeless Elegance: Black and white photography is known for its timeless, classic appeal. This preset captures the essence of this style while maintaining the authentic spirit of Nagpuri culture, making it ideal for creating emotional and powerful imagery.
Ideal Use
- Portrait Photography: The Nagpuri Black & White Preset works beautifully for portraiture, especially in capturing raw emotions and expressions in a dramatic way. It’s perfect for older subjects or people wearing traditional attire, where the emphasis is on the face and character rather than the color of clothing.
- Cultural & Event Photography: This preset is ideal for festivals, ceremonies, or local rituals, where the focus is on the people, their gestures, and the intimate moments of the event. It adds a powerful visual element by removing distractions from color and focusing on the story.
- Landscape Photography: The preset works wonderfully with rural landscapes and architectural elements, transforming them into moody, atmospheric black-and-white scenes. Whether it’s an old farmhouse, a bustling market, or a peaceful field, this preset gives the image a timeless, cinematic feel.
How to Apply the Nagpuri Black & White Preset in Lightroom
- Import Your Photo: Start by importing your photo into Lightroom.
- Go to the Develop Module: Click on the ‘Develop’ module to access editing tools.
- Apply the Preset: In the ‘Presets’ section, find the Nagpuri Black & White Preset and apply it to your photo.
- Adjust Exposure & Contrast: Depending on your image, you may want to tweak the exposure, contrast, and shadows to perfect the look.
- Increase the contrast to further accentuate the light and dark areas.
- Fine-tune the highlights to ensure the bright areas don’t lose detail.
- Refine with Detail Enhancements: If needed, sharpen the image or adjust the clarity to bring out more fine details, especially in textured areas like fabrics or skin.
- Export & Save: Once you are satisfied with the result, export the photo in the desired resolution and format.
Before & After Comparison
- Before: A color image of a traditional dance or village scene, possibly with a lot of visual elements competing for attention.
- After: Applying the Nagpuri Black & White Preset strips the photo of color, focusing entirely on contrasts, textures, and expressions. The image becomes timeless, with a stronger emotional impact as the intricate details come to life in the monochrome world.
Nagpuri Vintage Film Preset
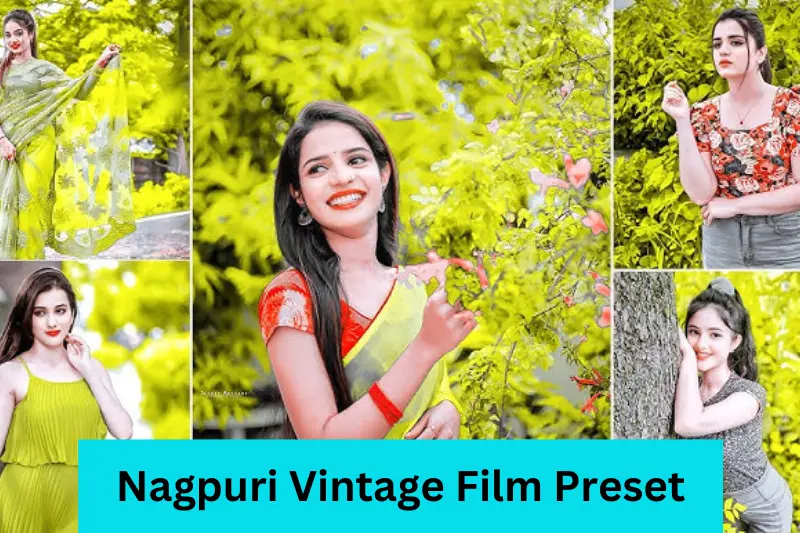
The Nagpuri Vintage Film Preset is designed to evoke the nostalgic charm of old-school film photography, offering a soft, cinematic look that transforms your photos into timeless pieces of art. This preset introduces a subtle grain effect and muted tones that add warmth, texture, and a classic feel, perfect for capturing the essence of Nagpuri culture, whether you’re photographing traditional attire, rural landscapes, or vibrant festivals. With its retro vibe, this preset creates an atmospheric, vintage look that makes your images feel like they were taken decades ago, adding a touch of storytelling and artistry to every frame.
Key Features
- Soft Film Grain: The preset applies a gentle grain effect that mimics the look of vintage film photography, adding texture and warmth to your images. This grain is subtle but enough to give your photos an organic, analog feel.
- Muted Tones: The colors are toned down with a slight desaturation, providing a soft, faded look that enhances the vintage aesthetic. This helps to create a sense of nostalgia and timelessness in the photo.
- Warm Tones: The preset adds warm, amber-like hues, especially in highlights, creating a cozy, inviting mood that is characteristic of old film photography.
- Cinematic Look: The combination of soft grain, muted colors, and warm tones gives your photos a cinematic quality, ideal for creating storytelling imagery or adding a dramatic touch to everyday scenes.
- Vignetting: Often included in the preset, vignetting darkens the edges of the image slightly, drawing attention to the center of the photo and further enhancing the vintage cinematic feel.
Ideal Use
- Portrait Photography: The Nagpuri Vintage Film Preset is perfect for capturing portraits with a nostalgic vibe. It adds a timeless quality to photos of people wearing traditional Nagpuri attire, highlighting the textures of fabric and the details in facial expressions.
- Festival & Cultural Photography: When photographing cultural festivals or traditional ceremonies, this preset gives the photos a classic, cinematic feel. The muted tones and soft lighting enhance the emotional impact of the moment, whether it’s a quiet, intimate gathering or an energetic festival scene.
- Landscape & Nature Photography: If you’re photographing the natural beauty of Nagpur—be it rural landscapes, fields, or architecture—the vintage film preset creates a dreamy, slightly faded look that adds depth and atmosphere to your images, making them feel timeless.
- Black & White to Color Conversion: For photos that have been converted from black and white to color, this preset helps restore the warmth and texture, giving them a more nostalgic feel while keeping the image’s integrity intact.
How to Apply the Nagpuri Vintage Film Preset in Lightroom
- Import Your Photo: Begin by importing your photo into Lightroom.
- Go to the Develop Module: Access the ‘Develop’ module to begin editing your image.
- Apply the Preset: In the ‘Presets’ section, find the Nagpuri Vintage Film Preset and apply it to your photo.
- Adjust for Perfect Vintage Effect: You may want to fine-tune the settings to suit the specific photo:
- Adjust the exposure to make sure your highlights are not too bright, maintaining the warm, soft effect.
- Increase or decrease the grain effect depending on how pronounced you want the vintage film texture.
- Experiment with the vignette slider to increase or decrease the shadowing around the edges of the photo.
- Fine-Tune the Colors: Depending on the subject, you may want to tweak the temperature slightly to enhance warmth or cool it down for a different retro vibe.
- Export and Share: Once you’re happy with the result, export the image in the desired resolution and format for online sharing or printing.
Before & After Comparison
- Before: A sharp, modern photo with bright colors and crisp details that might feel too new or clean.
- After: After applying the Nagpuri Vintage Film Preset, the photo takes on a nostalgic, slightly faded look with warm, amber hues and a soft grain. The image now evokes a sense of nostalgia and timelessness, as if it was captured on old film.
You May Also Like It:
How To Edit Photos With Snapseed App – Complete Detail – Aarya Editz
16K Photo Enhance In Just 1 Click – Complete Detail – Aarya Editz
Picsart Charistmas Special In Just Photo Editing – Aarya Editz
Comparison of All 3 Presets
When choosing the right preset for your Nagpuri photography, it’s essential to consider the mood and style you want to convey in your images. Each of the three presets—Nagpuri Warm Tone Preset, Nagpuri Black & White Preset, and Nagpuri Vintage Film Preset—has its unique qualities, and selecting the right one can elevate your photo to tell a specific story. Here’s a detailed comparison to help you decide which preset best suits your needs.
Nagpuri Warm Tone Preset
- Mood & Style: Warm, inviting, vibrant.
Key Features:
- Adds golden, amber, and brown hues.
- Enhances natural skin tones for portraits.
- Softens contrast and highlights while preserving details.
Best For:
- Outdoor portraits and festival photography, especially during the golden hour.
- Capturing the beauty of nature, like fields or rural landscapes.
- Enhancing warm colors in traditional attire and setting.
- Ideal Scenario: Use this preset for photos that need to evoke a cozy, welcoming atmosphere, such as family gatherings, outdoor celebrations, or landscapes drenched in sunlight.
- Example Use: A photograph of a family dressed in traditional Nagpuri attire during a festival under the soft glow of the setting sun.
Nagpuri Black & White Preset
- Mood & Style: Dramatic, timeless, high-contrast.
Key Features:
- Increases contrast, bringing out the details in shadows and highlights.
- Sharpens textures and edges, creating high clarity.
- Adds depth to the image with a focus on light and shadow.
Best For:
- Portrait photography, especially for capturing raw emotion and expressions.
- Rural life and architectural photography where texture and structure matter.
- Documenting cultural events or traditional rituals where the focus is on emotion and detail rather than color.
- Ideal Scenario: Best used when you want to create a bold, timeless look, emphasizing contrasts and textures over color.
- Example Use: A black-and-white portrait of a village elder wearing traditional clothing, capturing the wrinkles and texture of the fabric.
Nagpuri Vintage Film Preset
- Mood & Style: Nostalgic, cinematic, soft.
Key Features:
- Applies a soft film grain for a retro, analog feel.
- Muted colors and warm tones create a nostalgic vibe.
- Adds a subtle vignette effect for focus and mood enhancement.
Best For:
- Creating a vintage, cinematic look for portraits, festivals, or rural landscapes.
- Enhancing artistic or emotional shots where a classic feel is desired.
- Ideal for storytelling or evoking a sense of nostalgia in photos.
- Ideal Scenario: Use this preset when you want to convey a retro or cinematic vibe, adding character and depth to your photos.
- Example Use: A festival scene with vibrant colors softened into a warm, cinematic tone, creating a dreamy, retro look.
Side-by-Side Comparison:
| Feature | Nagpuri Warm Tone Preset | Nagpuri Black & White Preset | Nagpuri Vintage Film Preset |
| Color | Warm, earthy tones (amber, golden) | Monochrome (black and white) | Muted tones with soft color fading |
| Tone | Soft, vibrant, and inviting | Bold, high contrast, and dramatic | Soft, nostalgic, and cinematic |
| Best For | Outdoor portraits, festivals, landscapes | Portraits, rural life, architecture | Portraits, festivals, artistic shots |
| Effect on Skin Tones | Enhances and softens skin tones | Focuses on texture over color | Softens colors, creating a vintage feel |
| Ideal Use | Golden hour, nature, traditional attire | High-contrast emotional shots, rural life | Retro storytelling, cinematic ambiance |
| Vibe | Warmth, liveliness, comfort | Timeless, classic, intense | Nostalgic, dreamy, cinematic |
Which Preset Should You Choose?
- For Vibrant, Warm Photography: If you want to capture the warmth of Nagpuri landscapes or the vibrant spirit of a festival, the Nagpuri Warm Tone Preset is your best bet. It’s perfect for creating inviting and lively images where colors and warmth play a significant role.
- For Emotional, High-Contrast Shots: If you’re aiming to capture raw emotions, traditional portraits, or the textures of rural life, the Nagpuri Black & White Preset will elevate your photos into timeless works of art. It’s perfect for highlighting facial expressions, textures, and the dramatic contrasts found in rural settings or festivals.
- For a Retro, Cinematic Look: If you want to evoke a sense of nostalgia or create artistic, cinematic images, the Nagpuri Vintage Film Preset is ideal. It softens the colors, adds a film grain effect, and creates a dreamy atmosphere, making your photos feel like they’re from a different time.
Additional Tips for Nagpuri Photography with Lightroom
Nagpuri photography, with its rich cultural heritage, vibrant festivals, and stunning landscapes, offers a wealth of opportunities for stunning visuals. To further enhance your images, here are some additional tips for editing your Nagpuri photography using Lightroom, ensuring that every shot tells a captivating story while preserving the essence of the region.
Use Local Adjustments for Detailed Enhancements
- Radial Filters: When editing portraits or festival images, use radial filters to focus attention on your subject. This tool can help lighten the face, enhance skin tones, or subtly blur the background, allowing the subject to pop in the frame.
- Graduated Filters: If you’re photographing landscapes, especially rural settings like fields or roads, graduated filters can be applied to enhance the sky and foreground separately. This helps balance the exposure between the bright sky and darker land, bringing more detail and drama to your image.
- Adjustment Brush: The brush tool in Lightroom lets you make precise adjustments to specific areas. You can lighten the subject’s face, darken the edges of the frame, or even boost the color of traditional attire without affecting the rest of the image.
Enhance Colors with HSL Panel
- Boost Warm Colors: In Nagpuri photography, warm tones like red, orange, and yellow are prominent in traditional clothing, festivals, and natural scenery. Use the HSL (Hue, Saturation, and Luminance) panel to selectively increase the saturation of these colors. For example, increase the saturation of reds and yellows to bring out the vibrant colors of traditional attire or festival decorations.
- Tone Down Distracting Colors: If there are any distracting elements in your image (like a bright blue sky or neon signage), you can tone down specific colors in the HSL panel. Lowering the saturation of less important hues allows the more significant colors to stand out and maintain focus on the central subject.
Use the Tone Curve for Fine-Tuning Contrast
- Create Custom Contrast: The Tone Curve is an essential tool for refining the contrast of your photos. By adjusting the RGB (Red, Green, Blue) channels, you can create a more tailored contrast that complements the warm, earthy tones of Nagpuri imagery. For example, boosting the red tones can add warmth to your image, while tweaking the blues and greens helps balance the natural colors in rural landscapes.
- Create a Film-Like Effect: If you’re using the Nagpuri Vintage Film Preset, adjust the Tone Curve to add more faded shadows and highlights, giving your photos a more authentic film-like look. This softens the image and introduces a nostalgic feel to the final result.
Correct Distortion and Improve Composition
- Lens Correction: Nagpuri photography often involves wide-angle shots of landscapes or crowded festivals. Use Lens Corrections in Lightroom to remove any distortion or vignette caused by wide lenses. Correcting for barrel distortion ensures that straight lines remain straight, particularly when photographing architecture or rural pathways.
- Crop and Straighten: Use the crop tool to straighten horizons and improve the composition of your image. This is especially useful in landscape photography, where a tilted horizon can distract from the beauty of the scene. Lightroom’s guideline tool helps ensure your horizon lines are perfectly aligned.
Experiment with Split Toning for Mood Enhancement
- Add Subtle Color Tones: The Split Toning panel in Lightroom allows you to add a specific color tone to the highlights and shadows of your image. For instance, adding a warm amber tone to the highlights and a cool blue tone to the shadows can create a more cinematic, dramatic effect, which works wonderfully for festival or evening shots.
- Create a Retro Look: For a vintage feel, you can apply a subtle sepia tone to the shadows and highlights using Split Toning. This is especially effective when using the Nagpuri Vintage Film Preset, enhancing the film-like quality with a more pronounced retro look.
Fine-Tune Exposure for Mood and Lighting
- Manipulate Exposure to Set the Mood: Adjusting the exposure can drastically change the mood of your image. For example, reducing exposure and slightly boosting contrast can give your photos a moody, cinematic feel—perfect for black-and-white portraits or festival shots where the light plays a significant role.
- Use the Histogram: Keep an eye on the histogram to ensure your image isn’t overexposed or underexposed. If you’re shooting in difficult lighting conditions, such as bright sunlight or dim indoor settings during festivals, the histogram will help you make quick adjustments to ensure the image retains maximum detail.
Add Subtle Vignettes for Focus
- Create Depth with Vignetting: A light vignette can direct the viewer’s attention to the center of the image. In Lightroom, use the Post-Crop Vignetting tool to subtly darken the edges of the photo. This is particularly effective for portrait shots or images where you want the focus to be on a specific subject, like a person in traditional attire.
- Dramatic Vignette: For a more dramatic effect, you can apply a stronger vignette, especially when editing festival images or architectural photography. This draws the viewer’s eyes toward the focal point, enhancing the overall composition.
Sharpen Details for Texture & Clarity
- Enhance Textures: Nagpuri photography often features intricate details, from the textures of fabric in traditional clothing to the rough surfaces of rural landscapes. Use the Clarity slider in Lightroom to enhance texture and bring out fine details in the fabric, skin, and background elements.
- Sharpness for Faces and Key Elements: Increase the sharpness selectively for faces, buildings, or elements that you want to stand out. Use the Adjustment Brush for localized sharpening around the eyes in portraits, or to make key architectural details in landscape shots pop.
Create a Consistent Style with Preset Collections
- Save Custom Edits as Presets: If you frequently edit Nagpuri photography with similar settings, consider creating your own custom preset collection based on your unique style. This allows you to apply consistent edits across multiple images, which is especially useful when editing photos from the same event, festival, or location.
- Combine Presets: Feel free to combine the Nagpuri Warm Tone Preset with other adjustments like the Tone Curve and HSL tweaks to create a personalized look. By layering different edits on top of the preset, you can develop a distinct visual style that suits your photography.
Experiment with Lightroom Mobile
- Edit On-the-Go: If you’re shooting events or landscapes in Nagpur and need quick edits for social media or immediate sharing, Lightroom Mobile is an excellent tool. With the mobile app, you can apply your favorite presets and make quick adjustments to your photos on the spot, ensuring that you never miss a chance to capture and share the beauty of Nagpuri culture in real-time.
You May Also Like It:
Ultimate Adobe Photoshop Hacks for Professional Creatives – Aarya editz
Blur Effect Video Editing Tutorial – Complete Guide
Lightroom Orange Effect Premium Dng Preset – Complete – Guide – Aarya Editz
Common FAQs About Nagpuri Photography and Lightroom Presets
What is a Lightroom preset?
A Lightroom preset is a pre-made set of editing settings that you can apply to your photos with just one click. It helps save time by automatically adjusting things like exposure, contrast, colors, and tones. For example, the Nagpuri Warm Tone Preset adds a warm, golden touch to your images, making them look more inviting.
Can I use Lightroom presets for any type of photography?
Yes! Lightroom presets can be used for all types of photography, including portraits, landscapes, and events. You can use presets like Nagpuri Warm Tone Preset for outdoor scenes or Nagpuri Black & White Preset for dramatic portrait shots. Simply apply the preset and tweak the settings based on your photo for the best results.
How do I install and use Lightroom presets?
To use a preset, you first need to install it in Lightroom:
Download the preset file.
Open Lightroom and go to the Develop module.
On the left, find the Presets panel and right-click to select Import.
Find the preset file on your computer and click Import.
Once the preset is installed, you can click on it in the Presets panel to apply it to any photo.
What if I don’t like how a preset looks on my photo?
No worries! After applying a preset, you can easily adjust the settings to suit your image better. You can tweak things like exposure, contrast, or saturation until you’re happy with the result. Lightroom is very flexible, so you can fine-tune every detail.
Can I apply the same preset to all my photos?
Yes, you can apply the same preset to all your photos, especially if they were taken in similar lighting conditions. However, you might need to make small adjustments for each photo, depending on things like lighting, composition, and subject.
Are Lightroom presets free?
There are both free and paid presets available. You can find many free presets online that are great for everyday photography, like the Nagpuri Lightroom Presets. Paid presets often come with more advanced options and professional styles, but free ones are also very effective for most users.
Can I create my own presets?
Yes! Lightroom allows you to create your own presets by adjusting the settings on a photo and then saving them as a preset. This way, you can apply your custom edits to other photos without having to repeat the same adjustments. To save a preset, click on the + icon in the Presets panel and select Create Preset.
How do I use the Nagpuri Vintage Film Preset?
To use the Nagpuri Vintage Film Preset, simply import your photo into Lightroom, go to the Develop module, and click on the preset under the Presets panel. The preset will apply a soft grain effect, muted colors, and warm tones to give your photo a retro, nostalgic feel. You can adjust the settings to make the effect stronger or softer depending on your preference.
How can I make my photos look like they were taken in the golden hour?
If you want your photos to have that warm, golden-hour glow, the Nagpuri Warm Tone Preset is perfect. It boosts warm colors like yellows and oranges, making your images look like they were shot just before sunset. You can also adjust the temperature and tint sliders in Lightroom to further enhance the warm tones.
Can I use Lightroom Mobile to edit my Nagpuri photos?
Absolutely! Lightroom Mobile is a great option for editing photos on the go. You can apply Nagpuri Lightroom Presets on your phone or tablet just like you would on a computer. If you’ve saved your presets, you can sync them across devices and use them while traveling or attending festivals.
What’s the best preset for festival photography?
For festival photography, the Nagpuri Warm Tone Preset works beautifully because it enhances the vibrant colors of the event, such as traditional clothing and decorations. If you’re looking for a more dramatic effect, you can also try the Nagpuri Black & White Preset, which adds strong contrasts and brings out the emotions of the moment.
Can I make my photo brighter with Lightroom?
Yes, you can adjust the exposure to make your photo brighter. In Lightroom, you’ll find the Exposure slider in the Basic panel, which allows you to lighten or darken your image. If you need a more specific adjustment, use the Adjustment Brush to brighten certain areas of the image.
How do I make my photo look more professional with Lightroom?
To make your photos look more professional, use Lightroom’s tools to fine-tune the details:
Apply a preset that matches the vibe you want (e.g., Nagpuri Vintage Film Preset for a cinematic look).
Adjust the contrast and sharpness to enhance the details.
Use the radial filter to highlight your subject or adjust the background.
Add a subtle vignette to draw attention to the center of the image.
Conclusion
In conclusion, using Lightroom presets for your Nagpuri photography is a quick and easy way to enhance your photos. Whether you’re looking to bring out warm tones, create a vintage look, or add dramatic black-and-white effects, presets like the Nagpuri Warm Tone, Nagpuri Black & White, and Nagpuri Vintage Film can help you achieve stunning results with just a few clicks. Don’t forget, you can always make further adjustments to fine-tune your photos. With a little practice, you’ll be able to create professional-looking images that capture the beauty and culture of Nagpur effortlessly!
Bonus Points for Nagpuri Photography with Lightroom
- Quick Edits on the Go: Use Lightroom Mobile to apply your favorite presets and make quick adjustments while traveling or at events. It’s perfect for editing on the spot.
- Batch Processing: Save time by applying the same preset to multiple photos at once. This is especially useful when editing photos from the same event or shoot.
- Experiment with Color Grading: Try color grading your photos to add a cinematic or stylized look, especially with the Nagpuri Vintage Film Preset. You can play with shadows, midtones, and highlights for a unique effect.
- Create Custom Presets: Once you’ve created the perfect look, save your settings as a custom preset to use again in the future. This helps maintain consistency across your photos.
- Fine-Tune with Local Adjustments: Use Lightroom’s local adjustment tools (like the radial filter or graduated filter) to enhance specific areas of your photo, such as brightening faces or adding more contrast to the background.
- Sharpen for Details: Make your photos pop by increasing the sharpness and clarity of key elements like faces or textures, especially for portraits and close-up shots.
- Work with the Histogram: Keep an eye on the histogram to make sure your photo isn’t too dark or light, ensuring you retain the best details in both shadows and highlights.
You May Also Like It:
Snapseed Double Expoure Photo Editing – A Comprehensive Guide
Picsart Editing Background Colour Change – Detail Guide – Aarya Editz
Snapseed Background Colour Change Photos Editing – Aarya Editz
Aqua And Yellow Free Lightroom Preset – Detail Guide – Aarya Editz.